Summary
This document offers instructions for modifying the keyboard layout of a Windows keyboard to better work for Apple computers. The short description is that you can map the keys on a Windows keyboard to have the same location as you would expect to find them on an Apple keyboard.
Note that the instructions on this page are written for macOS 12 Monterey and previous versions of macOS. At the bottom of this page are instructions for macOS 13 Ventura.
Apple Keyboard
The default layout for an Apple keyboard shown below has the control, option (Alt), and command (system) keys to the left of the spacebar. [Product Page]
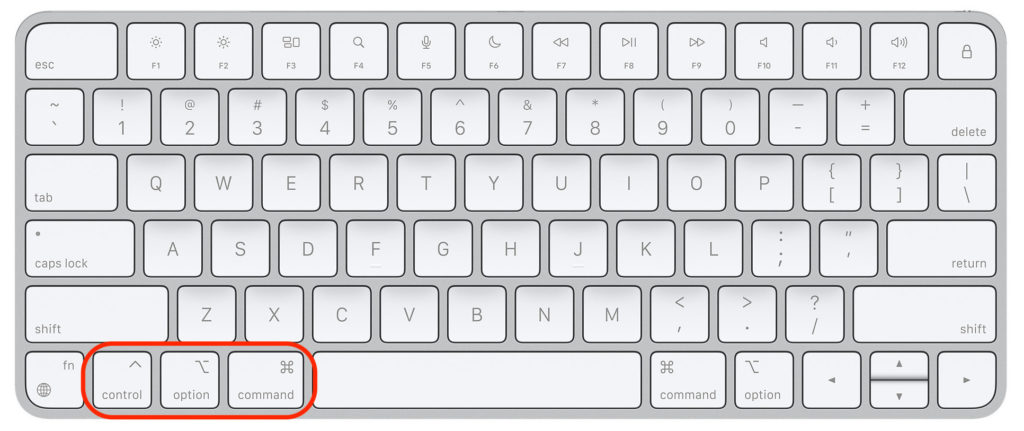
These keys are used frequently on Mac computers. For those having memorized their position and use, it’s important for them to be in the expected locations.
Windows Keyboard
Below is are two examples of typical Windows computer keyboards. The command key shown on the Apple keyboard above is similar to the Windows Start menu button shown below.
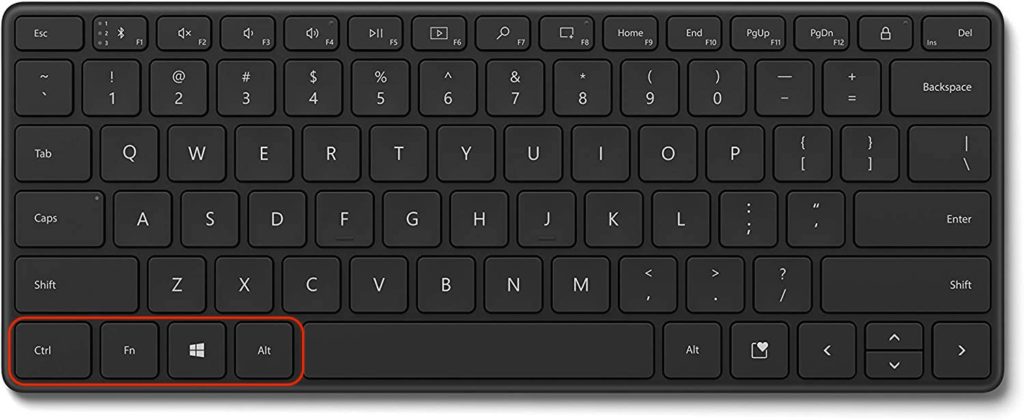
The example above has an Fn (function) key in the group of modifier keys to the left of the spacebar. [Product Page]
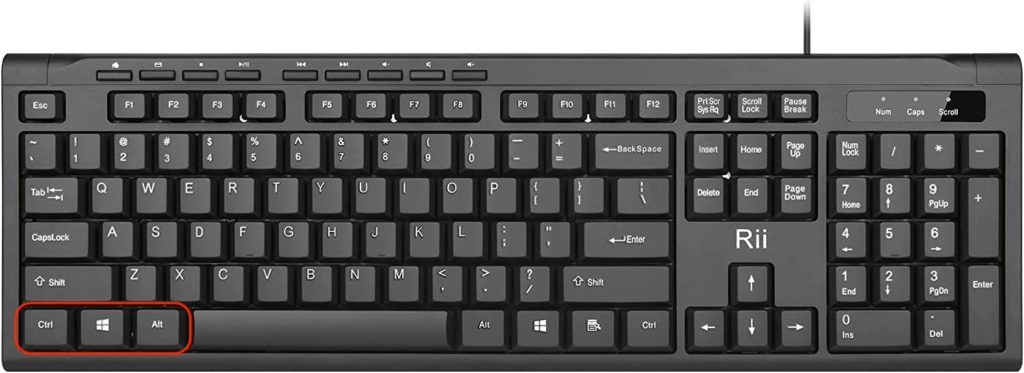
Below is the more traditional Windows desktop keyboard, with no Fn (function key). [Product Page]
If you want to disregard the key locations, and use the keys as they are labeled, then nothing further needs to be done.
- The Windows Start key will function like the Apple Command key.
- The Windows Alt key will function as the Apple Option key.
You will only need to change your expectation for the location of those keys.
Keyboard Layout Configuration
To configure a Windows keyboard to have a familiar Apple keyboard layout, follow these instructions.
- From the Apple menu, choose System Preferences.
- Select Keyboard.
- Click on the Modifier Keys button in the lower right.
- The mapping/assignment for modifier keys will be displayed. By default, the keys are mapped as expected for an Apple keyboard.
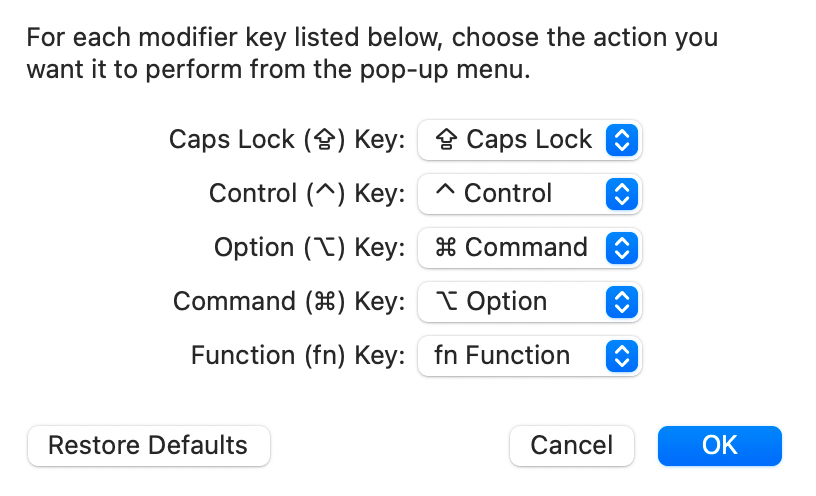
- Set the Option key to function as the Command key.
- Set the Command key to function as the Option key.
- When done, click the blue OK button.
- You may want to put a sticker over the Windows Start key and Windows Alt key. The Windows Start key can be labeled Command. The Windows Alt key should be labeled as Option.
For anyone who has memorized the Apple locations for these keys, having them in the expected locations will be helpful.
For anyone who looks at their keyboard while typing, the key labels will be important.
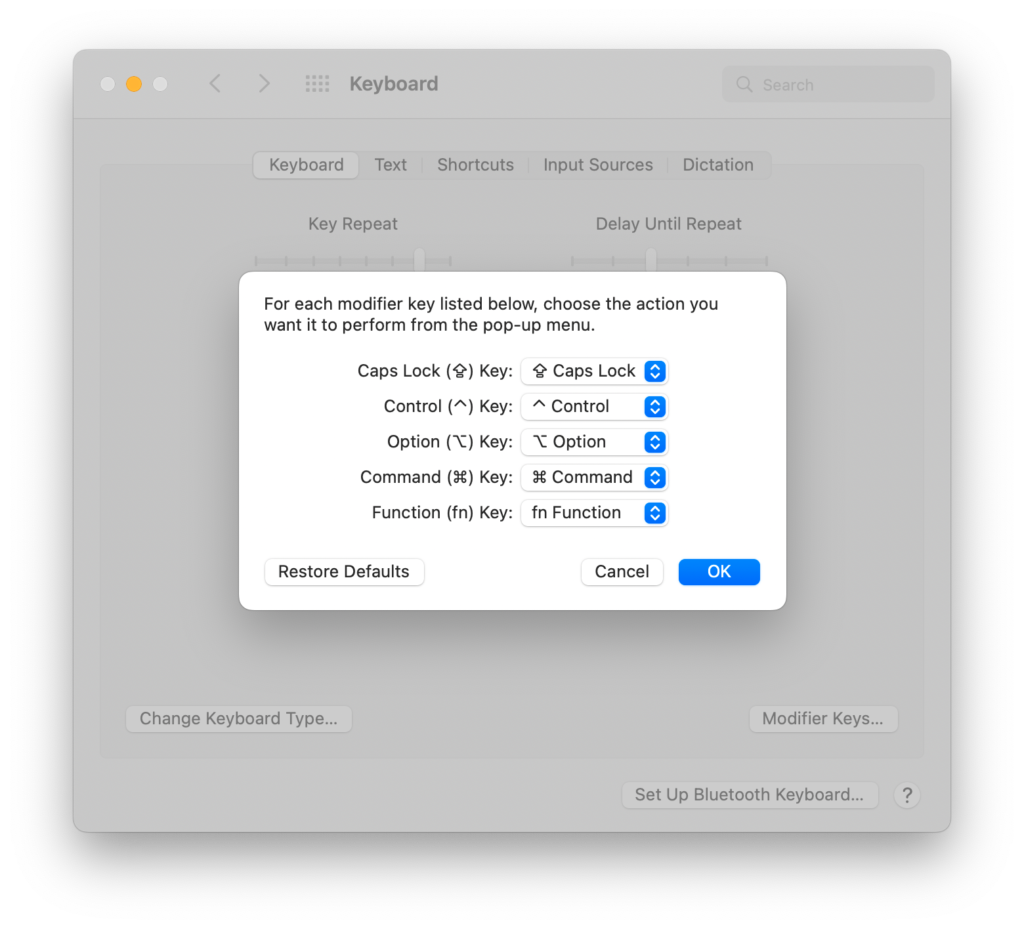
Settings Visuals
The Keyboard settings window is shown below. These images are based on macOS System Preferences settings as they have been for many years. The layout changed dramatically with macOS 13 Ventura.
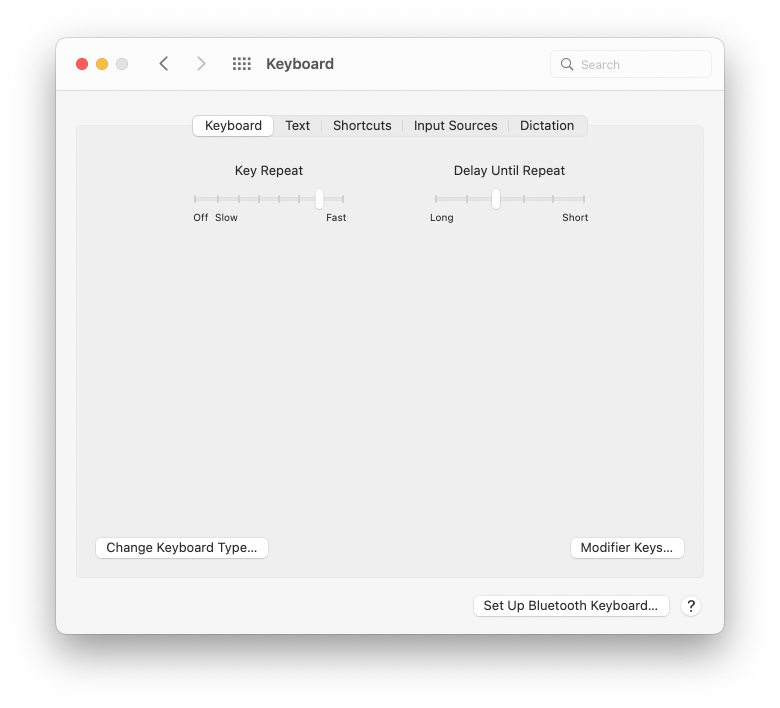
After selecting the Modifier Keys button (above) the following window will be displayed, probably with the default settings configured as shown below.
After assigning the key locations to accommodate the Windows keyboard layout, the settings will appear as shown below.
Command and Option Keys
Apple keyboards typically have the Command and Option keys to the left and right of the spacebar, making their use more convenient with either left or right hand.
Pressing Command+P on an Apple keyboard will request the Print dialog box. On an Apple keyboard, this can be done with the right hand.
With the key mapping changed as described above, the Alt keys on the left and right of the spacebar will now both function like the Command key.
If you do not customize the keyboard mapping, then you may end up with only one Command key (the Windows Start) button. A Windows keyboard without a Command key to the right of the spacebar would require left and right hands to initiate the Command+P key combination.
Keyboard Use
On a Windows computer, the key combination Control+C would copy the selected text or items. In the Apple world, instead of Control+C, you would press Command+C. Even though an Apple Mac keyboard has a Ctrl key, it is used differently than in the Windows world. Below are some common key combinations.
- Command-X: Cut the selected item and copy it to the Clipboard.
- Command-C: Copy the selected item to the Clipboard. This also works for files in the Finder.
- Command-V: Paste the contents of the Clipboard into the current document or app. This also works for files in the Finder.
- Command-Z: Undo the previous command. You can then press Shift-Command-Z to Redo, reversing the undo command. In some apps, you can undo and redo multiple commands.
- Command-A: Select All items.
- Command-B: Set as Bold for selected text.
- Command-I: Set as Italic for the selected text.
- Command-F: Find items in a document or open a Find window.
- Command-G: Find Again: Find the next occurrence of the item previously found. To find the previous occurrence, press Shift-Command-G.
- Command-H: Hide the windows of the front app. To view the front app but hide all other apps, press Option-Command-H.
- Command-M: Minimize the front window to the Dock. To minimize all windows of the front app, press Option-Command-M.
- Command-O: Open the selected item, or open a dialog to select a file to open.
- Command-P: Print the current document.
- Command-S: Save the current document.
- Command-T: Open a new tab.
- Command-W: Close the front window. To close all windows of the app, press Option-Command-W.
Apple has a support document with more information about keyboard shortcuts. [View]
Apple and Windows Keyboard Benefits
Apple Keyboards
These are some of the benefits and drawbacks of a typical keyboard made by Apple:
- Battery Life — Apple keyboards a generally very smart with their use of power and thus last a long time between charges. The rechargeable batteries used in Apple laptops are apparently very slim because the keyboards are quite slim.
- Brightness — For Apple laptop MacBook and desktop iMac computers, there is a brightness control on the keyboard making it easy to keep the display brightness at the optimum setting for clarity and comfort.
- Cost — Apple keyboards are generally more expensive than economy priced Windows compatible keyboards. For example, it’s not uncommon to spend $100 to $180 for an Apple keyboard. Inexpensive USB wired Windows keyboards can be $10 to $20. [View Examples]
- Fingerprint Reader — Newer Apple computers with the Apple M1 processor can utilize the fingerprint biometrics for login. This is very convenient and even useful for login on websites.
- Key Travel — The distance needed to depress a key is called the key travel. Apple keyboards generally have a shallow key travel. A benefit is possibly less fatigue. A drawback is that crumbs and dust can sometimes get into the mechanism and make some keys stop working.
- Setup — Apple keyboards come with a USB to Lightning cable for charging. This cable also provides an instantaneous paring and setup function when you connect the cable to your Apple Mac computer.
- Volume — Apple keyboards have “media controls” which include volume up/down or mute as well as play, pause, forward, and back for audio and video control.
- Wireless — Apple keyboards are either built-in on the MacBook laptop computers, or wireless with the iMac desktop computers. This has some advantages in reducing cable clutter.
Third-Party Apple Mac Keyboards
Third-party Mac compatible keyboards provide a wider set of features than those offered by Apple. For example, some Bluetooth wireless keyboards can switch between several devices.
Windows Keyboards
These are some of the benefits and drawbacks of a typical keyboard designed for Windows.
- Cost — The budget minded person will appreciate that inexpensive USB wired Windows keyboards can be $10 to $20. [View Examples]
- Ergonomic — Introduced decades ago by Microsoft, ergonomic keyboards allow for a more natural alignment of the hands and wrists.
- Specialty — There are some fun specialty keyboards that may be designed for Windows but work with Apple as well.
- Wired — There are many Windows compatible wired keyboard options. These typically can work with Apple also.
At the top of this page is a description of how a Windows keyboard can be mapped for easier use with Apple. So, keyboards designed for Windows are only mentioned specifically here as a distinction and grouping.
Benefits of Using Different Keyboards
These are some of the benefits to using different keyboards throughout the day or week:
- Fatigue — Reduce fatigue by slightly altering repetitive motions for more muscular diversity. Keyboards with different switch motion and resistance can help in this regard.
- Features — You may have some work that can benefit from having backlit keys. When it’s not disruptive, you may like using noisier clicking keys. If needing a quiet keyboard, you can switch to that during times it’s needed. You may like a smaller 11-inch wide keyboard for the small size, but sometimes need a larger keyboard with number pad for numerical entries.
- Mind — Helps sharpen the mind and muscle memory to learn slightly different layouts.
Instructions for macOS 13 Ventura
As of macOS 13 Ventura, the familiar System Preferences has been replaced with System Settings and a slightly different presentation of the settings. For keyboard mapping, follow these instructions:
- Go to the Apple menu in the left corner of the display.
- Select System Settings.
- The new System Settings layout is similar to what you might see on an iPhone or iPad with the Apple ID information at the top, and a column of options listed below that.
- You will need to use the search option at the top of the column. Type in “modifier keys” (quotes not needed).
- In the search results, click on Customize modifier keys.
- You will see a window similar to the one below. For a Windows keyboard, if you want, you can use the modified settings shown below to swap the Command and Option keys which correspond to the Windows Start Menu key and the Function keys on a Windows keyboard. The default configuration is to have keys mapped as identified on the keycaps (Option = Option and Command = Command).
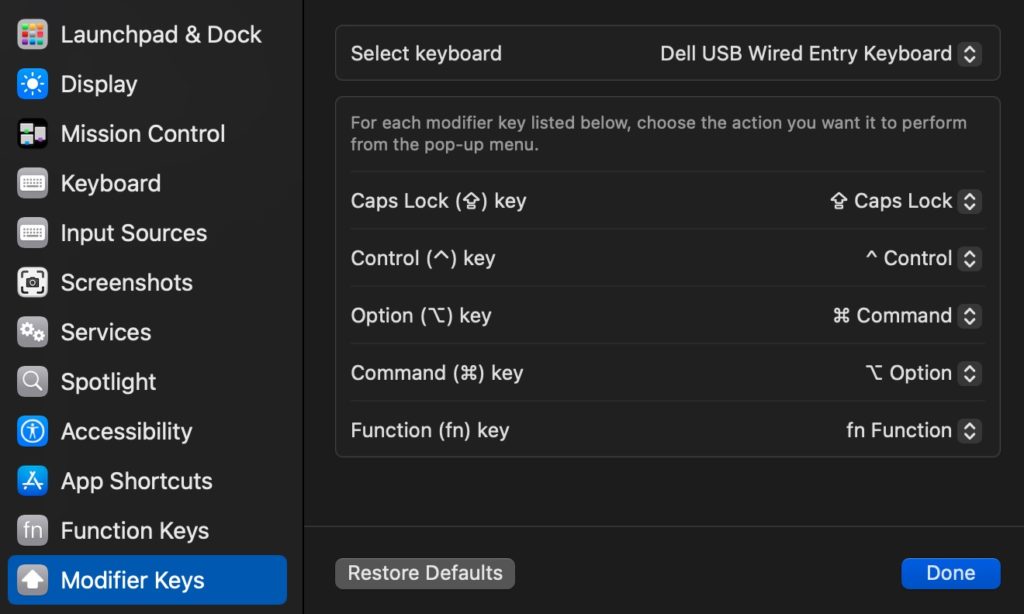
NOTE: In the 13.0 version of macOS Ventura, some of the visuals do not comply with established macOS or iOS layout standards. This is likely an oversight. For example, there is no red dot to close out the window and no ‘back’ option or way to cancel. You must press the blue Done button to close the window.
