Summary
Setting up a computer with Linux Mint is a fairly simple task and can make good use of an older PC to provide a familiar computing experience without the cost of ongoing subscriptions and intrusive connections to big tech companies. The instructions on this page describe the basic setup process. You will need a working computer to create the installation USB, or acquire it from a friend. This page assumes you are setting up Linux Mint 22.1 version.
STEP #1 — Download Mint ISO Image File
Go to the Download page on the Linux Mint website — https://www.linuxmint.com/download.php
Click on the Download button found on that page to download the ISO (installer image).
You will be taken to a page with a long list of possible download sites. Choose a provider from your country that seems reputable that you trust. While all the providers should be trustworthy, it’s nice to use one you feel comfortable with.
STEP #2 — Verify Download Authenticity
To ensure that the downloaded image is not corrupted or altered, follow the instruction on the download page (the one with the list of download providers) under the heading “Integrity & Authenticity” and click on the sha256sum.txt button (for example) to view the correct verification identification key.
On an Apple Mac computer, you can put the downloaded ISO file into your home folder. The home folder is where you see all of your subfolders such as Desktop, Documents, Downloads, etc.
Once you’ve put the file in that location, go to the Terminal console (found in Utilities).
At the command prompt, type the following command:
- shasum -a 256 linuxmint-22.1-cinnamon-64bit.iso
Then press the Enter key. This example assumes you have downloaded version 22.1 of Linux Mint.
After a few seconds (or longer on a slow computer) a long string of letters and numbers should show in the Terminal window.
Compare that string of letters and numbers with the string of letters and numbers on the Linux Mint Download page and make sure they match. This verifies you have a trusted copy of the installation image file.
STEP #3 — Create a Bootable USB Flash Drive
The Raspberry Pi Imager is available for download here — https://www.raspberrypi.com/software/
It is a simple media creation tool that was primarily developed for making Raspberry Pi startup drives, but it works well for creating other Linux bootable media on USB flash drives.
To use the software follow these steps:
- Download the Imaging Utility and install it. The program can be run on Linux, Windows, or Apple computers.
- Be sure to have a new (or empty) USB flash drive inserted in your computer. It will be required in a moment. It will be erased so, be sure there is nothing on it you need. The capacity should be 8GB or larger. In a moment you will need to select this USB to have it erased and configured.
- Run the Raspberry Pi Media Creator Image Utility
- On the startup screen, ignore the “Choose Device” option.
- Under “Operating System” for “Choose OS” scroll down and click on “Use custom” then browse your computer to find the Linux Mint ISO. This would work for other Linux ISO images also.
- For “Storage” click on “Choose Storage” and be very careful to choose the new or empty USB flash drive you inserted earlier. If you choose an incorrect drive, you may unintentionally erase files.
- Click the “Next” button to setup the startup bootable Linux USB flash drive.
- You will be told when the process is complete, and when instructed, remove the USB flash drive.
STEP #4 — Startup with Setup Flash Drive
Plug the USB flash drive into the computer where it will be installed. Ideally you would have a computer with an empty solid state drive already installed.
Different brands of computers use their own unique function key on startup to choose the Boot Mode. For Dell computers, it would be the F12 key.
So, assuming you have a Dell desktop computer, with a fresh new solid-state drive installed:
- Insert the USB bootable media that contains Linux Mint, and turn on the computer, pressing F12 as it is starting.
- There should be a startup screen indicating that F12 can be pressed for the Boot menu (or F2 can be pressed for the BIOS system hardware settings).
- On the Boot Menu, choose the USB flash drive that has the Linux Mint startup media.
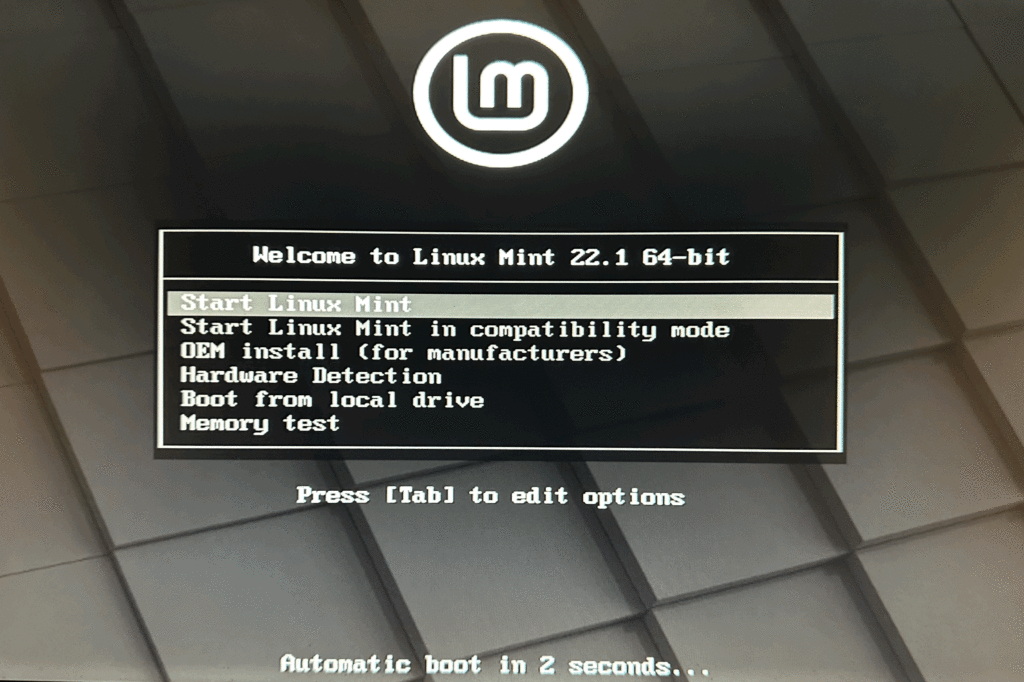
- As Linux Mint is starting, the process will pause at an options screen similar to the one below. Wait for the countdown to continue the process automatically.

STEP #5 — Run the Linux Mint Installer
Eventually the Linux Mint desktop will show and an “Install Linux Mint” icon will show on the desktop. Double-click that icon to begin the installation and setup process.
You will be asked some basic questions about your country, language, username, password, and other preferences.
When prompted, choose to install the Media Codex options for maximum compatibility with various audio and video files.
The computer will restart and you will need to login with the password you established.
STEP #6 — Additional Configuration and Software
Linux Mint includes the following software:
- Firefox — An Internet browser similar to Chrome, Edge, or Safari
- LibreOffice — Similar to Microsoft Office, with word processing, spreadsheet, presentation, image software and a calendar app.
- Thunderbird — Similar to Microsoft Outlook, this is an email client that allows you to check email for many different accounts. In a single place you can save emails to your computer for local storage and backup. You can also search and compose messages with advanced features.
There are many other helpful utilities and applications included with Linux Mint.
If you want to install Zoom video conferencing software, read “Linux Mint 22 Zoom Install — Fix Text Display Issues.”
Linux Mint is fairly effective at finding network printers and configuring them for use. HP tends to work well with Linux Mint.
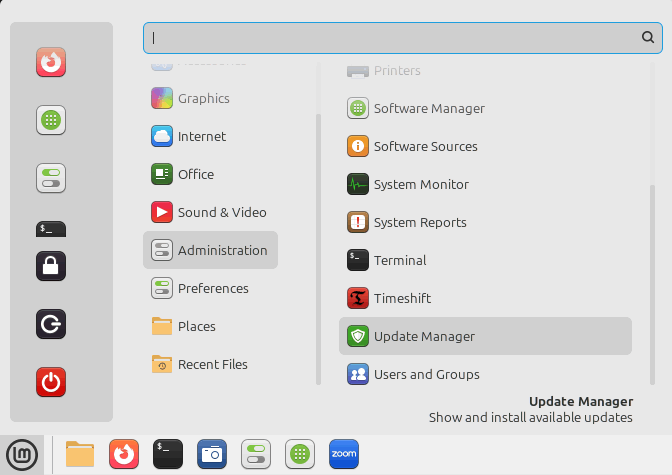
You can look for additional updates from the Linux Mint system menu (LM in lower left corner of your screen) and in the Administration tab, scroll down to find Update Manager as shown below. Choose that to see if any updates are available.

Explore the available programs and applications. Any that you plan to use frequently can be placed in the row of icons at the bottom of the screen by running the software, then right click on the program icon and choose “Pin to panel” for the icon to be added to the bottom of the screen.
In the image above, you can see the icons for the file manager, Firefox, Terminal, Screenshot, System Settings, Software Manager, and Zoom.
Conclusion
The above process should result in a good foundation for getting started with Linux Mint.
