Summary
This page provides a simple checklist of of setup steps for Apple Mac computers. It is assumed that you already have an Apple ID and iPhone. These steps improve on the default Mac settings. The instructions are based on macOS 13 Ventura which is the current Mac operating system as of 2023. The scenario here assumes you are repurposing an old computer or setting up a new one.
Smartphone Similarities
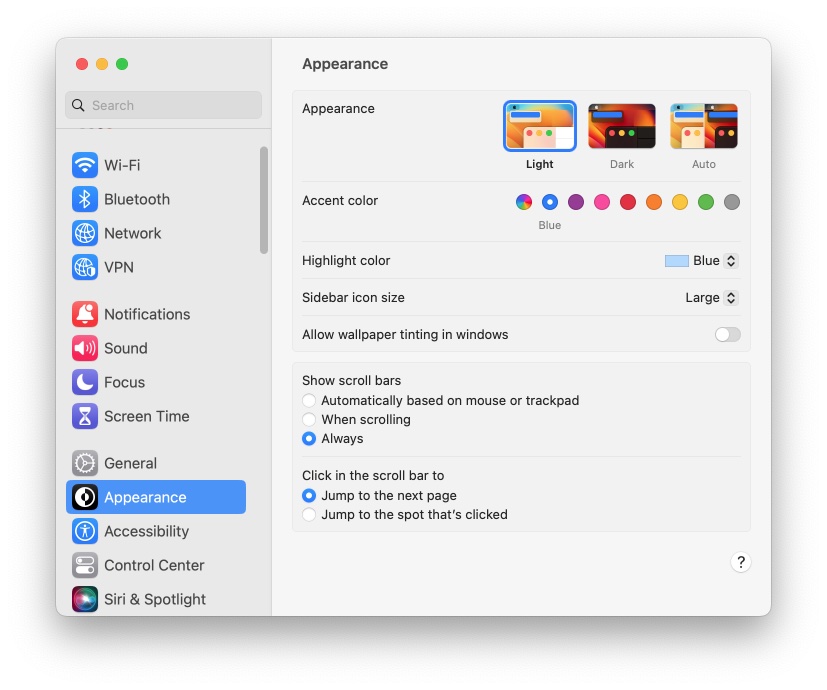
As of 2023, with macOS 13 Ventura, Apple computers replace System Preferences with System Settings, with a similar appearance to the settings screen in an iPhone or iPad as shown below.
The instructions on this page assume you are using Ventura. Older versions of macOS will have slightly different instructions.
Preparation — Remove Previous Owner
These instructions assume you have a new computer, or are starting with a used one you purchased or were given. You would need to have the previous owner’s login and Apple ID information if they did not previously remove the device from their account.
If the device was already removed from the previous owner’s account, then you can skip Step #1 and Step #2 below, going directly to Step #3.
If you have purchased a new computer, you can go to Step #5.
STEP #1 — Turn Off Find My Mac
When Apple devices are connected to an Apple ID iCloud login with the “Find My Mac” feature turned on, they are locked to that particular user account. If you are using a Mac computer that was purchased or given to you, it will be important to turn off that feature and sign out of the Apple ID account.
This is done in Settings. At the top of the left column you may see the previous owner’s name with the words Apple ID under it. When you select that, on the right are the Apple related features and settings available.
Choose Find My Mac and turn that off. You will be asked for the Apple ID and password of the registered owner of the device. When you provide the correct information, the device will no longer be locked with Find My Mac. This is a security feature to prevent a lost or stolen device from being easily used by another person.
STEP #2 — Sign Out
You should Sign Out from the previous owner’s Apple ID to have the device fully disassociated from the old account.
Go to System Settings. Click on the person’s name at the top of the left column. The resulting page will provide an overview of settings, services, and devices associated with the Apple ID. At the bottom of the page, click on Sign Out.
If asked about keeping data, you can choose to not keep the data since it would presumably have been synched with the old user’s iCloud data.
STEP #3 — Erase Drive
The Apple System Recovery process may perform a fresh macOS installation without removing any user files. Assuming there was a previous owner, to start with a clean drive, you will want to erase the drive.
Start the computer while holding the Command+R keys. This will load the system recovery mode, prepared to install the original version of macOS that would have shipped with the computer.
If the drive is corrupted, or the recovery partition isn’t working you may need to use the Internet recovery option. This requires that you have access to a fast WiFi internet connection. If you have a USB to Ethernet adapter, you could connect to a router directly with a wired connection.
If you start the computer while holding the Option+Command+R, the system recovery mode may offer the latest macOS compatible with the computer.
Before installing macOS, you will want to choose the Disk Utility from the available options in System Recovery.
Erase the Macintosh HD. If there is a Data partition you can remove that also. This erase process will ensure that you start with a clean drive.
You will want to end up with a single Macintosh HD, then exit Disk Utility to return to the main System Recovery screen options.
After the drive is erased, the computer will no longer startup without using Recovery Mode. Instead, a dark folder will show on startup to indicate that the operating system has not yet been installed.
STEP #4 — Install macOS
From the main recovery screen, choose the option to install the operating system.
You will be asked which drive to use. There should only be one drive listed, the Macintosh HD.
If there are two drives listed, it’s likely you need to use Disk Utility (see Step #3) to format the drive and remove partitions.
The installation will provide provide you with a progress indicator. After the installation, the process will continue with the initial setup login.
STEP #5 — Initial Setup Login
After macOS is installed, the initial setup login process will guide you through the remaining basic installation steps.
- Country — Choose your country. This may already be automatically selected based on the Internet IP address.
- Accessibility — You can choose options during setup for various visual and accessibility settings. Choose Not Now to adjust these later.
- Data & Privacy — You will be presented with the Data & Privacy policy.
- Migration Assistant — If you have an older Apple or Windows computer in good working order, you could copy the old system to the new one. Occasionally it is nice to start completely fresh to avoid bringing in excess files or possible corruption from an older computer. Click the “Not Now” option to skip this option if you wish.
STEP #6 — Sign In with Your Apple ID
You can setup your Apple ID login and iCloud later. However, if a tech friend is helping with the setup, to save you time later, you may want to confirm that your Apple ID login works and begin the iCloud synchronizing of basic data.
If this step is skipped, then additional work is needed later, and you may need assistance with those additional steps.
- NOTE: If the computer is at a repair shop with unknown workers and possibly access from other people, it may be best to perform this and the additional steps on your own with help from a tech savvy friend.
The Apple login process will alert the Apple ID owner on their iPhone or iPad with a map and message stating “someone is trying to login at this location.” It is okay to click Allow at this step. The location may not be accurate since it is based on the Internet service IP address.
After clicking Allow on the iPhone, a 6-digit number will be displayed on the iPhone. This number will be entered where requested on the computer during setup.
After entering the random 6-digit number from above, you can Agree to the iCloud Terms and Conditions.
STEP #7 — Create a Local User Computer Account
Having completed the Apple ID login with iCloud above in Step #6, the next step will be to Create a Computer Account.
This will merge and connect the new user account you create with the Apple ID information you entered above.
- Full Name — You may want to use your common name rather than your full legal name for this entry. It’s how the computer will initially refer to you.
- Account Name — To simplify your user account folder name, it is preferred to use your first name for the account name entry.
- Password — If you use a complicated password, and then forget it later, you will not be able to get into the computer. You will need to start this process all over again and possibly lose your files. So, be sure to choose a common password that you know and can remember. This is a password that will be required to login and for other system tasks.
- Hint — A password hint can help remind you of what password you used.
- Allow Reset — There is an option to allow your Apple ID to reset the password. This means, if you know and remember your Apple ID (email and password) it would be possible to reset the password.
STEP #8 — Enter iPad or iPhone Passcode
At this next step, you may be asked to enter the PIN for your iPhone or iPad, depending on what devices are known to be registered and in use associated with your Apple ID. This is an extra precaution to ensure the owner is involved with the setup.
Going forward, from this point, once logged in, the computer will have the synchronization of some programs and information such as contacts, calendar, photos, Safari bookmarks, etc.
This is probably fine a trusted person assisting in the setup process.
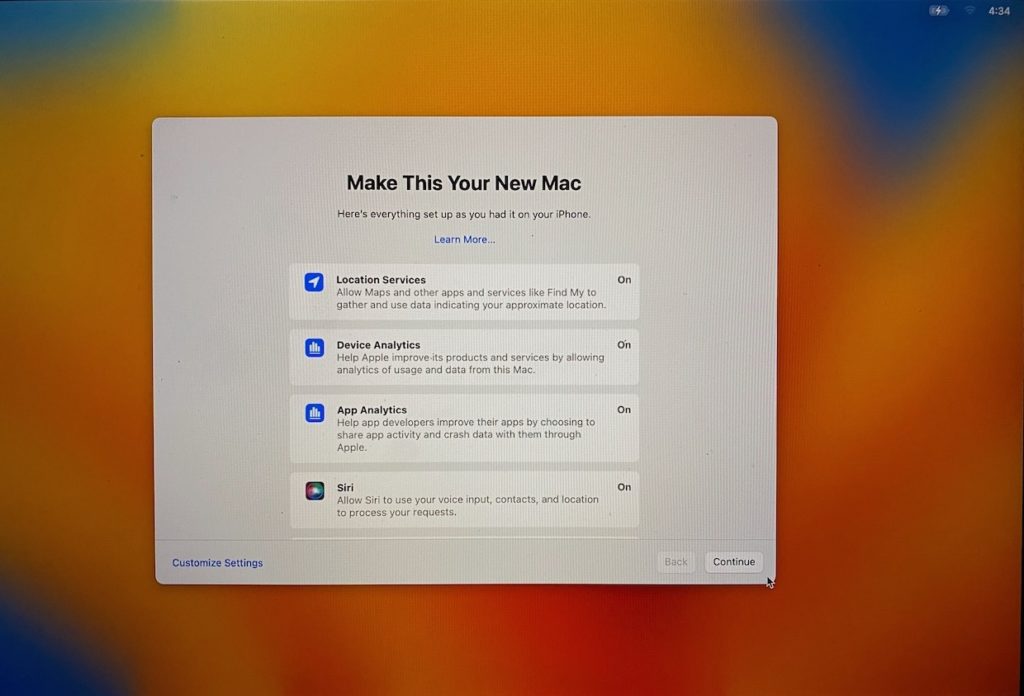
STEP #9 — Make This Your New Mac
Some of the default system settings will be preconfigured as shown below. You can scroll down to see the list of available options and make changes, or change them later. Click Continue when ready.
STEP #10 — File Vault Encryption
After making the selections in the previous step, the FileVault Disk Encryption options will be listed as shown below.
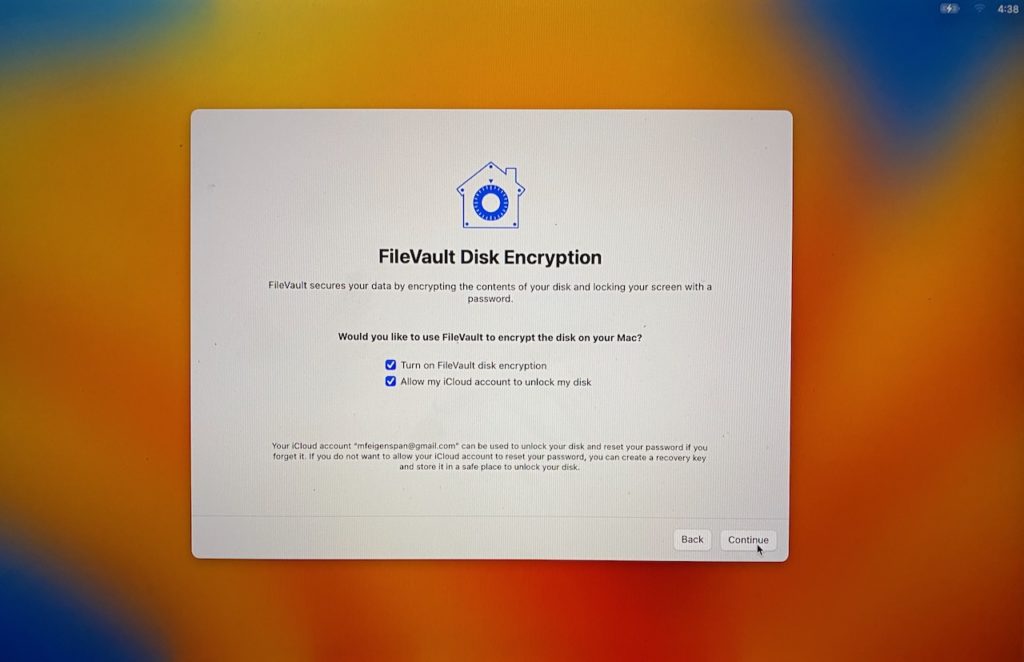
Encryption may protect data if your device is lost. However, it makes data recovery more difficult if the drive crashes. Static systems, like hard drives, with no accompanying two-factor authentication or other intelligence, are susceptible to brute force attacks. Thus, encrypted drives are potentially accessible to those who are very determined.
For these reasons, you may wish to choose not to encrypt the drive.
STEP #11 — Improved Operations
The following changes will provide improved operations. Some of these steps require using System Settings, found under the Apple menu in the top left corner of screen.
- Tap to Click — By default it is necessary to press hard on the trackpad to perform the “click” function. The default setting on most computers and devices is to have a light tap on the trackpad perform a click function. This setting can be changed by going to System Settings > Trackpad > and turning on “Tap to click.”
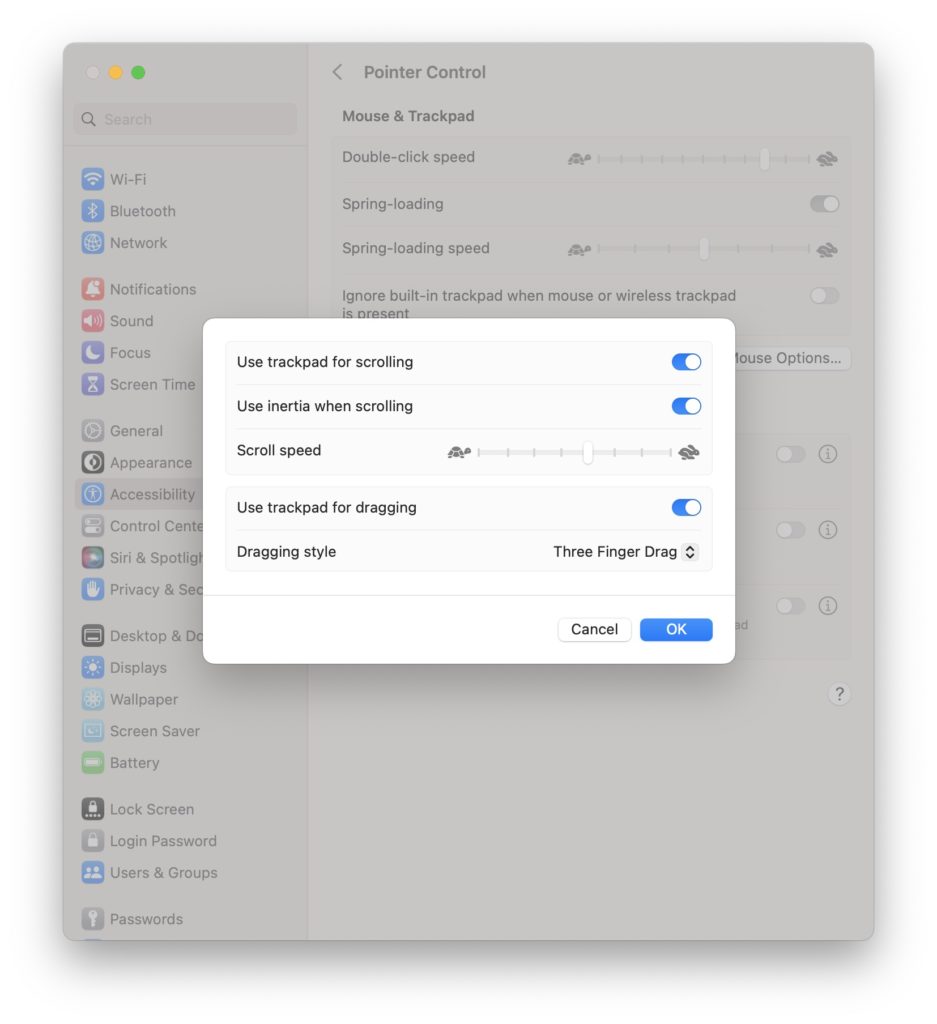
- Easy Click Hold — To move an icon or file, to move a scroll bar, to resize a program window, and for other tasks, it is typically necessary to click the trackpad with one hand and then with the other hand move the item. This is the same as click, hold, and drag with a mouse. An easier method is available that allows for three fingers on the trackpad to function like a mouse click and hold. To enable this, go to System Settings > Accessibility > and click on Trackpad Options. Turn on the option to Use trackpad for dragging. Under dragging style, choose three finger. The settings should be as shown below.
- Scroll Bars — It is important to have scroll bars displayed when available as a reminder of where and when they can be used. By default, they are hidden. To fix this, go to Settings > Appearance > and under “Show scroll bars” select the option for “Always.”
- Macintosh HD — A common feature on Apple computers has been to have the Macintosh HD showing up on the desktop. This was removed in recent years. To enable it, go to Finder > Settings > and put a checkmark in the box next to Hard disks.
- Finder Sidebar — You can now click and drag the Macintosh HD drive to the top of the left column sidebar in Finder.
- Applications — You can create an easy one-click icon on the Dock for easily accessing applications. To do this, click on the Macintosh HD in Finder. From there, click and drag the Applications folder to the Dock to the space immediately left of the Trash icon, being careful not to drop the Applications folder in the trash. Once the icon is in the Dock, use hold the control key and click on the Applications folder in the Dock. Alternatively you can right click on the Applications icon. A menu will appear. Under the faint gray heading “Display As” choose the Folder option. Now you can click on the Applications folder any time to view the available programs.
- Home Folder — From the Macintosh HD, open the Users folder. Click and drag your home folder to the area just to the left of the Trash, being careful not to drop your entire Home folder in the trash. Once the icon is in the Dock, use hold the control key and click on the Home folder in the Dock. Alternatively you can right click on the Home icon. A menu will appear. Under the faint gray heading “Display As” choose the Folder option. Also, under “view content as” choose List.
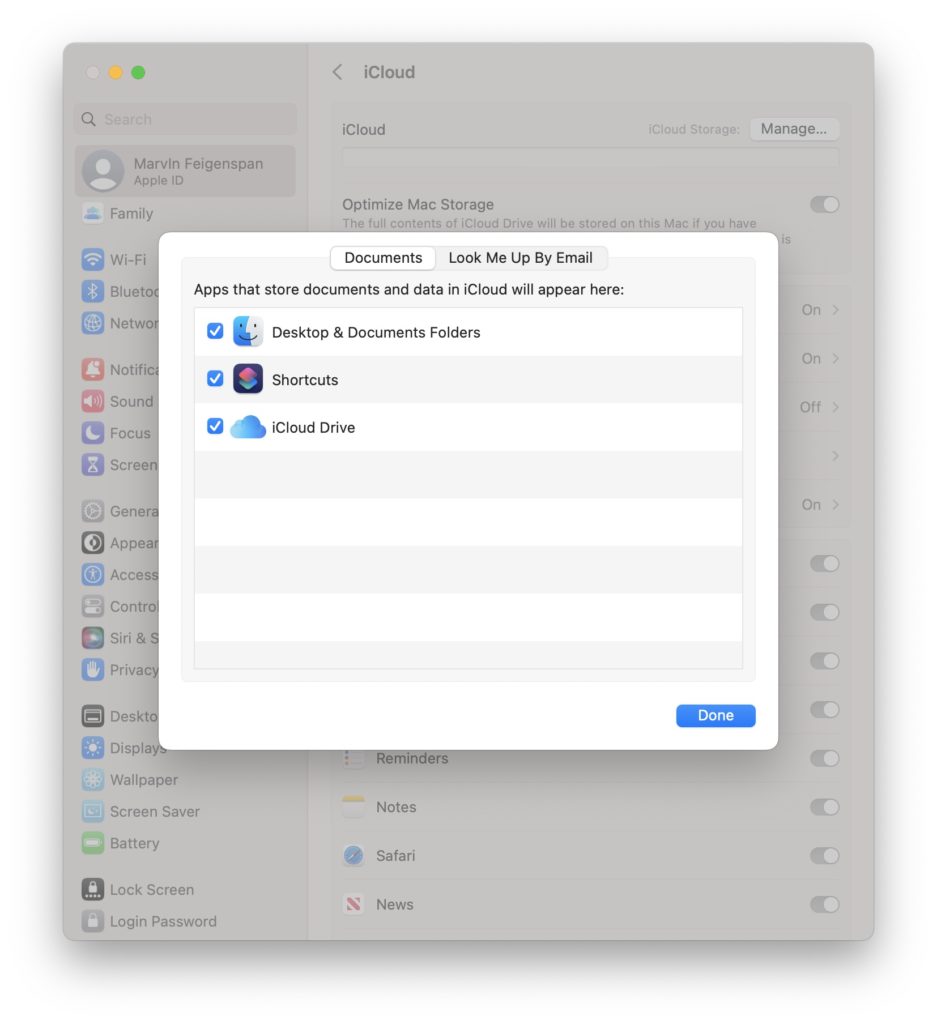
STEP #12 — iCloud Drive Settings
Apple provides cloud storage similar to Google Drive or Microsoft OneDrive. There are three levels of use: (1) Web only, (2) Native app with selective use, (3) Native app with full synchronization.
What this means is that you can select the manner of using the cloud storage. For people with a few smaller files, the full cloud synchronization of files should work fine.
For people with many hundreds or thousands of files, with many larger files like videos, it may be best to have limited use of the cloud storage.
Below settings are shown for the full synchronization of iCloud Drive to include Desktop & Documents Folders.
Note that with Apple and Windows computers, the cloud synchronization does not include the Downloads folder and other important folders. So, an alternate backup method should still be used.
STEP #13 — Clean Restart
The default setting when restarting the computer is to automatically on startup, reload the many programs that are running. This is a problem because over time, if people don’t close out their programs after use, they will accumulate. You may start or restart your computer and have dozens of programs and files opening.
By removing the checkmark, your computer will startup with the minimal number of background tasks running.
STEP #14 — Internet Accounts
You may have additional email accounts besides your Apple ID account. You can setup the computer to access and synchronize with Google, AOL, Yahoo, and other email accounts. This includes contacts, calendars, notes, and other data depending on the service you are connecting to.
When adding a Google Gmail account, it may be necessary to confirm with two-factor authentication. This is typically done using the Gmail App on your smartphone. When you confirm “Yes, it’s me” then you will be given a choice of numbers. On the smartphone, choose the number shown that is the same as the one shown on the computer.
STEP #15 — Software Programs and Apps
When possible, purchase and use programs from the Apple App Store. Some software programs are only available for download from a provider’s website. Such as Zoom. Or specialized printer software with utilities such as printer cleaning and scanning capabilities.
Only install the software you really need. Some programs provide redundant features already included with your computer, such as software to save documents in PDF format. That ability is already built-in.
You may want to install some antivirus software, but check with family and friends to see if an additional license can be shared with you to save on subscription fees.
Conclusion
There are probably additional customizations to make or considerations not mentioned above, but the listed setup steps will be a good start.
