Introduction
If you have an old gaming computer and want to upgrade the core components, this page offers some suggestions for possible component upgrades.
Component Options
This is a short list of options for the various components needed. The final selections are further down the page.
Motherboard
Basic motherboards are available in the $100 to $200 price range. Stepping up from a basic configuration generally results in better expansion and performance options for about $200 to $350. The I/O interface generally offers more ports and higher speed connectivity. The suggestions below are listed in order by price with links to Best Buy product pages.
- MSI – MAG Z790 TOMAHAWK WIFI DDR4 Socket 1700 USB 3.2 Intel Motherboard, Reg. $290 / Sale $250, [Best Buy]
- MSI – MPG Z690 EDGE WIFI DDR4 Socket LGA 1700 USB 3.2 Intel Motherboard, Reg. $300 / Sale $250 [Best Buy]
- ASUS – ROG STRIX Z690-E GAMING WIFI Socket LGA 1700 USB 3.2 Intel Motherboard, Reg. $380 / Sale $272 [Best Buy]
- ASUS – PRIME Z790-A WIFI (Socket LGA 1700) USB 3.2 Intel Motherboard, Reg. $310 / Sale $290 [Best Buy]
- MSI – MPG Z790 EDGE WIFI (Socket LGA 1700) USB 3.2 Intel Motherboard, Reg. $380 / Sale $310 [Best Buy]
- ASUS – ROG STRIX Z790-E GAMING WIFI (Socket LGA 1700) USB 3.2 Intel Motherboard, Reg. $500 [Best Buy]
The MSI and ASUS brands are both considered high quality. As expected, each brand will have fans who insist one is better than another. However, a balanced reviewer states: “I currently use an MSI motherboard, but my last computer was an ASUS ROG board. Both give me the same performance, at least in the areas I use and notice.” [Source: Tech News Today by Laurel Devoto, 29 Jul 2022]
Video Card
Having a video card and motherboard from the same manufacturer may be a benefit and helps avoid having separate utility software for hardware components. Here are two video cards to consider:
- ASUS – NVIDIA GeForce RTX 4070 Ti TUF Overclock 12GB GDDR6X PCI Express 4.0 Graphics Card, $850 [Best Buy]
- MSI – NVIDIA GeForce RTX 4070 Ti 12GB VENTUS 3X OC 12GB DDR6X PCI Express 4.0 Graphics Card, $830 [Best Buy]
Processor – Intel
A basic desktop computer may perform fine with a Core i5 processor. While gaming computers primarily place a heavy load on the GPU (graphics card processor) a more powerful CPU for basic computational processes is helpful.
- Intel – Core i7-13700K 13th Gen 16 cores 8 P-cores + 8 E-cores 30M Cache, 3.4 to 5.4 GHz LGA1700 Unlocked Desktop Processor, Reg. $490 / Sale $400 [Best Buy]
Fan
Small computer cases generally can’t accommodate a larger fan, so low-profile models are used. [Example 1, Example 2]
Some low-profile fans may not have the thermal capability to keep a hot-running processor adequately cooled. So, a 120mm fan with a larger area for cooling fins would be recommended.
- Thermaltake – Contac Silent 12 120mm CPU Cooling Fan, Reg. $30 / Sale $25 [Best Buy]
- Intel E97379-003 Core i3/i5/i7 Socket 1150/1155/1156 4-Pin Connector CPU Cooler with Aluminum Heatsink and 3.5-Inch Fan for Desktop PC Computer, Reg. $12 [Amazon]
Memory
A reasonable memory capacity would be 32GB of RAM for a powerful computer. The newest memory standard is DDR5 which has faster speed and better throughput than older RAM standards. Here are some examples of possible kits which typically include two 16GB memory sticks.
- CORSAIR – VENGEANCE RGB 32GB (2PK 16GB) 6000MHz DDR5 C40 Desktop Memory, Reg $115 / Sale $103 [Best Buy]
- CORSAIR – VENGEANCE RGB 32GB (2PK 16GB) 5600MHz DDR5 C40 Desktop Memory Kit, Reg $115 / Sale $100 [Best Buy]
- CORSAIR – VENGEANCE 32GB (2PK x 16GB) 5600MHz DDR5 C36 DIMM Desktop Memory, Reg. $105 / Sale $90 [Best Buy]
- Crucial Pro 32GB Kit (2x16GB) 2800 MHz DDR5-5600 UDIMM Desktop Memory, Reg. $99 [Best Buy]
Speeds of 5600MHz or 6000MHz are available with some models offering colorful RGB lighting.
Storage
Having a 1TB system drive would be helpful if the size of installed games will take up significant space. Here are some options to consider:
- Crucial – P3 1TB Internal SSD PCIe Gen 3 x4 NVMe, Reg. $43 / Sale $40 [Best Buy]
- Crucial – P3 2TB Internal SSD PCIe Gen 3 x4 NVMe, Reg. $99 / Sale $72 [Best Buy]
- Crucial – P3 4TB Internal SSD PCIe Gen 3 x4 NVMe, Reg. $230 / Sale $166 [Best Buy]
- Samsung – Geek Squad Certified Refurbished 980 PRO 2TB Internal SSD PCIe Gen 4 x4 NVMe for Laptops, Reg $200 / Sale $100 [Best Buy]
- WD – BLACK SN770 1TB Internal SSD PCIe Gen 4 x4, Reg. $130 / Sale $50 [Best Buy]
- WD – BLACK SN770 2TB Internal SSD PCIe Gen 4 x4, Reg. $240 / Sale $110 [Best Buy]
Case and Power Supply
If for some reason you decide to build a new system rather than using your old case and power supply, you may with to consider these options:
- CASE – CORSAIR 4000D AIRFLOW ATX MidTower Case – Black, Reg $105 / Sale $90 [Best Buy]
- POWER SUPPLY — EVGA – GT Series 850W Auto Eco Mode with FDB Fan 80 Plus Power Supply, Reg $150 / Sale $130 [Best Buy]
Component Review
There are many variables that determine compatibility and sometimes descriptions of products are different than the actual specs of products that may change over time. So, it is a big benefit to have a more flexible return period with a local retailer for exchanges.
Purchasing from Best Buy with a My Best Buy Total membership offers the following benefits:
- Fast free home delivery typically arriving the same day or within 24 hours
- Lower prices are sometimes available than typical Best Buy prices
- Longer return period
- Extended warranty coverage
Build Notes — 8 Sep 2023
Here are the build notes for the assembly process. For this build, the only components brought forward from the old computer are the system and data hard drives.
Component List and Assembly Order ($2,000)
The following components were purchased new and are listed in order by use during setup. The approximate cost of all the components is about $2,000 with tax and shipping.
- CASE – CORSAIR 4000D AIRFLOW ATX MidTower Case – Black, Reg $105 / Sale $90 [Best Buy]
- POWER SUPPLY — EVGA – GT Series 850W Auto Eco Mode with FDB Fan 80 Plus Power Supply, Reg $150 / Sale $130 [Best Buy]
- DRIVES — This system is being assembled with the previous system and data drives that were in use.
- DRIVE CABLES — In the past, motherboards would come with SATA drive data cables. Newer motherboards do not include these although SATA ports are on the system for legacy hardware if needed. Straight SATA cables were ordered for about $8 [Amazon] and an angle adapter for $8 to use with the HDD [Amazon] as well as a SATA power extension for $9 to provide a straight connection to the angle adapter. [Amazon]
- MOTHERBOARD — ASUS – PRIME Z790-A WIFI (Socket LGA 1700) USB 3.2 Intel Motherboard, Reg. $310 / Sale $290 [Best Buy]
- CPU — Intel – Core i7-13700K 13th Gen 16 cores 8 P-cores + 8 E-cores 30M Cache, 3.4 to 5.4 GHz LGA1700 Unlocked Desktop Processor, Reg. $490 / Sale $400 [Best Buy]
- CPU FAN — Intel E97379-003 Core i3/i5/i7 Socket 1150/1155/1156 4-Pin Connector CPU Cooler with Aluminum Heatsink and 3.5-Inch Fan for Desktop PC Computer, Reg. $12 [Amazon]
- RAM — CORSAIR – VENGEANCE RGB 32GB (2PK 16GB) 6000MHz DDR5 C40 Desktop Memory, Reg $115 / Sale $103 [Best Buy]
- VIDEO CARD — ASUS – NVIDIA GeForce RTX 4070 Ti TUF Overclock 12GB GDDR6X PCI Express 4.0 Graphics Card, $850 [Best Buy]
Grounding During Assembly
Have as much grounding as possible during this process and handle the components carefully, preferably only touching edges or non-conductive parts. Keep on hand or arm on the metal computer case while working with parts. Try to avoid excessively walking on carpet or wearing clothing that promotes static electricity.
STEP #1 — Case Prep and Notes
Computer cases generally arrived pre-assembled, but there is still a little prep required prior to use. With this particular case selection, there is a clear glass panel to remove for access to the inside of the case. Here are some additional notes relating to the case design.
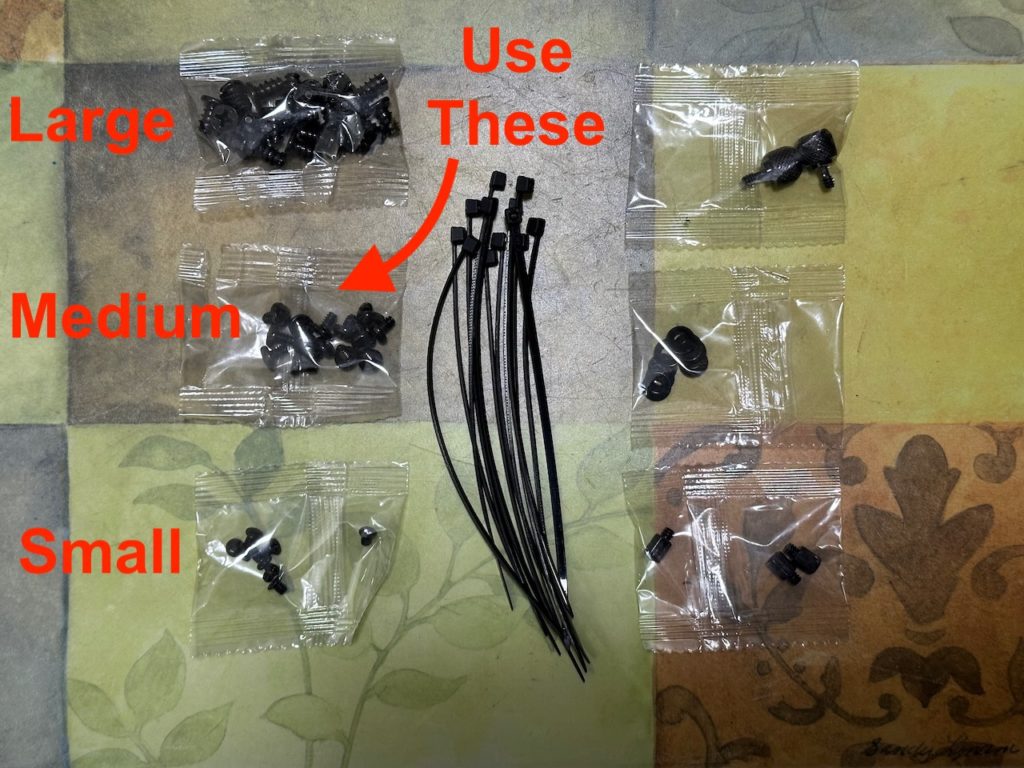
- CABLE MANAGEMENT — The case comes with three zip ties to guide case wiring, three additional velcro ties, about a dozen zip ties, and many screws for drive mounting and other purposes. There is a recessed channel to guide the case wiring.
- COVER — The side panels of a computer case allow access to the spacious area of the case where the motherboard is located, and on the other side a removable cover provides access typically to drives, cables, and power supply. The Corsair case has covers that are easy to remove and put back in place without worrying about alignment struggles or sharp unfinished metal edges.
- DRIVE BAYS — Some cases have space reserved in the front for multiple vertically stacked 3.5-inch drive bays and perhaps some dedicated 2.5-inch drive mounting positions. Older cases would also have 5.25-inch drive bays for CD/DVD/Bluray drives. With this particular Corsair case, there are two mounting points to accommodate two 2.5-inch drives (typically solid state). These are on the back panel on the opposite side of the case from the motherboard. There are also two 3.5-inch drive bays in the open space at the bottom of the computer where the power supply is located. They are toward the front of the computer. The sliding drive rails are a single piece of slightly flexible molded plastic with pegs for drive mounting without screws. The 3.5-inch drive bay assembly has two thumbscrews. The one most easily accessed slightly obstructs the ability to rotate the power supply for cable adjustments. So, removing that one thumbscrew helps with moving the power supply in and out of the case or angling it when guiding cables. Removing the drive bay assembly will help expand the space available for cable management.
- FAN — Computer cases generally come with fans that are properly sized for the case. With this model, there are two large case fans — one in the front to bring air in, and one in the rear to expel the warm air from inside the case. Larger fans are able to spin at lower RPM while moving a large volume of air which makes them have generally quieter operation especially if they are of high quality. With the addition of the CPU fan, three GPU fans, and and PSU fan, there will be a total of seven fans in the system. The case fans have power wires with a modular end that plugs into the motherboard. Some systems can adjust the fan speed based on processor load and/or heat.
- FILTERS — Filters included with computer cases to reduce dust intake are generally quite porous so as not to restrict airflow. This case has a typical mesh filter in the front and a slide-out filter on the bottom where the power supply air intake is. The front filter is held in place with magnets. On the top of the case, there is a magnetic metal mesh cover that is very nicely designed and finished. A small yellow plastic tab with Corsair written on it allows for easy removal.
- FRONT COVER — There is a nicely designed metal grill on the front of this case that is held in with four snug retainers similar to a speaker cover making them removable with a light pull. Under the metal grill is a very nice mesh dust filter held in with magnetic retainers and a plastic bezel. It appears to be easy to clean if dust builds up. The ease of access encourages more frequently cleaning. Having a good air intake filter system will keep dust off components that might otherwise cause them to overheat.
- GLASS COVER — Some brands and models of cases have very stiff retaining spring clips which requires much force to remove the glass panel. Wit this particular Corsair case, the panel has a snug fit but is easily removed.
- POWER SUPPLY BAY — A typical design for computer cases is to have the power supply slide out through a hole in the back of the case. With this Corsair design, the power supply is easily installed and removed from the side by removing the metal panel that covers the right side of the computer. The spacious area for drives and power supply makes it easier to navigate wiring and access the power supply even after installation.
- RUBBER FEET — Some brands and models of cases have adhesive rubber feet on the bottom. This case has strong metal reinforced stabilizing feet with rubber on the bottom.
- SCREWS — The computer case comes with a variety of screws, including what seem to be two thumbscrews for the case side-cover panel. These are pictured below in the power supply installation description.
- WIDTH — At 9-inches wide, this case is about an inch wider than other typical cases that are about 8-inches wide. The case feels more spacious on the inside.
- WIRING — Computer cases typically have a power button, USB ports, audio port, and reset switch, as well as status lights on the front of the case. These all require special wiring to connect with the motherboard. This particular case has the wiring neatly run through a channel to a location close to the connections on the motherboard.
STEP #2 — Power Supply
The power supply is one of the first components to go into the case because the power wires need to be threaded through the case. Once the other components are installed, it would be difficult to run the power wires through the case.
CORDS — With a modular power supply, component power delivery wires can be plugged into the power supply as needed. Additional modular wires may be saved for later. If there is a chance additional power cords will be needed, installing them during the system assembly is the easiest time to install them. If cords need to be installed later, the power supply may need to be removed for access later. The Corsair case design allows access to the modular cable ports, but ease of access depends on the specific port location. The following power cables from the power supply would be used on a typical computer system. Additional cables would be needed for any additional drives or graphics cards beyond what’s listed here.
- Motherboard power
- CPU power
- GPU power
- Drive power
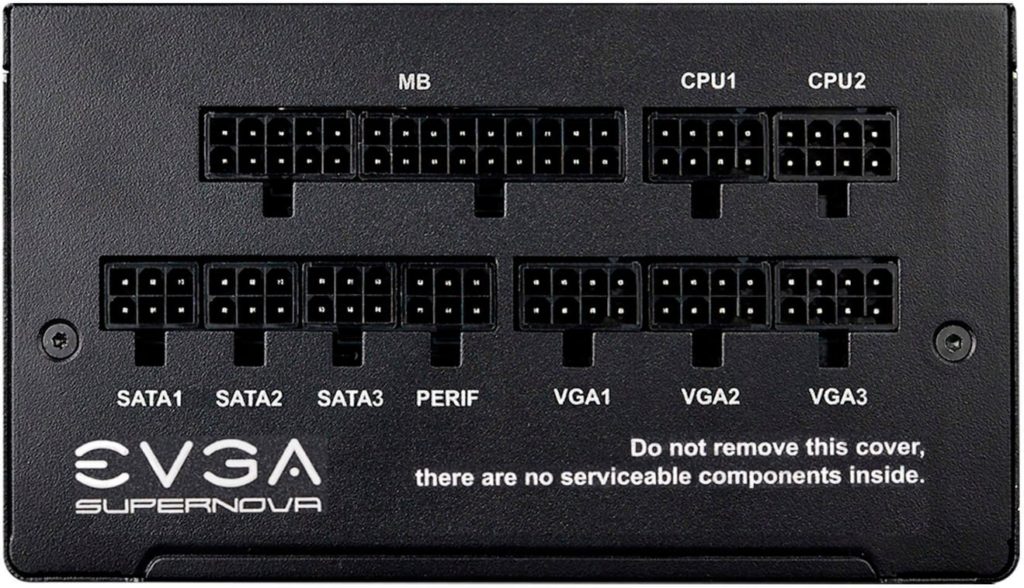
Below is an image of this particular power supply for the side that has the modular power cable connection ports which are described here in the order shown.
- MB — The Motherboard connection (MB) has a 10-pin modular connector and an 18-pin modular connector that fit into the assigned ports.
- CPU — Newer computers may have two CPU power cords. The connection end on the motherboard is typically found near the CPU. Some older motherboards may have only one CPU power cable connection.
- SATA — Hard drives have a standard power cord connector for 2.5-inch and 3.5-inch drives. A single SATA power cord may have a few power connections for several drives. In a large computer case designed for a file server there might be many drive bays so several power delivery cords may be needed. In a computer case where drives are in different locations, additional cables may be used to reach areas of the case spread apart from each other. However, for most computers, a single SATA power cord would be adequate to provide power to a few drives.
- PERIF — Any additional components using the standard hard drive power cable connection can use the peripheral power cable. Most people won’t need that cable.
- VGA — A gaming computer with a dedicated video card would need additional power beyond what is provided through the PCI bus connection. The VGA power cords are used for this purpose. Some computers have two or three video cards, so that is why three power ports are provided. A simple computer systems that uses a video card powered by the PCI bus slot would not need an additional video power cord. Also, computers using integrated video and graphics powered by the CPU do not need additional video power cords.
VIDEO POWER CABLES — Some video cards are powered by the PCI bus and need no additional power. Mid-range video cards may require an additional power connection. High-end video cards typically require two power connections. For this reason, a typical power supply video power cord has two ends.
The ASUS – NVIDIA GeForce RTX 4070 Ti video card has a special adapter (dongle) that accommodates two video power connections and combines those into a single unified proprietary power delivery plug that is inserted in a receptacle on the top edge of the video card.
The flexible Y-adapter has two female modules. They appear to be designed for the dual plug ends of a single video power cord. However, the two ends of a single video power cord should not be used with the video card adapter. Instead, use two separate cables. This is explained on page 3 of the setup guide as shown below.
The furthest end plug on the video cable fits and works. The middle connector doesn’t work and won’t fit. With the power supply, there is a single video card power cord included that will work as the secondary power cord and it is less bulky than the two head cable.
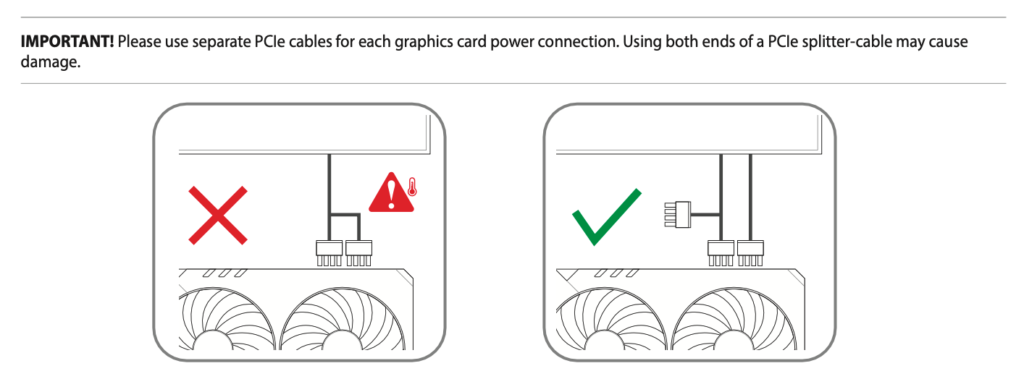
Using a two headed cable and single plug end cable as shown above should work.
CORD INSTALLATION — The motherboard, CPU, drive, and video power cords can be connected the power supply and guided through the case to the approximate location where they will be needed. Then continue to the next setup step.
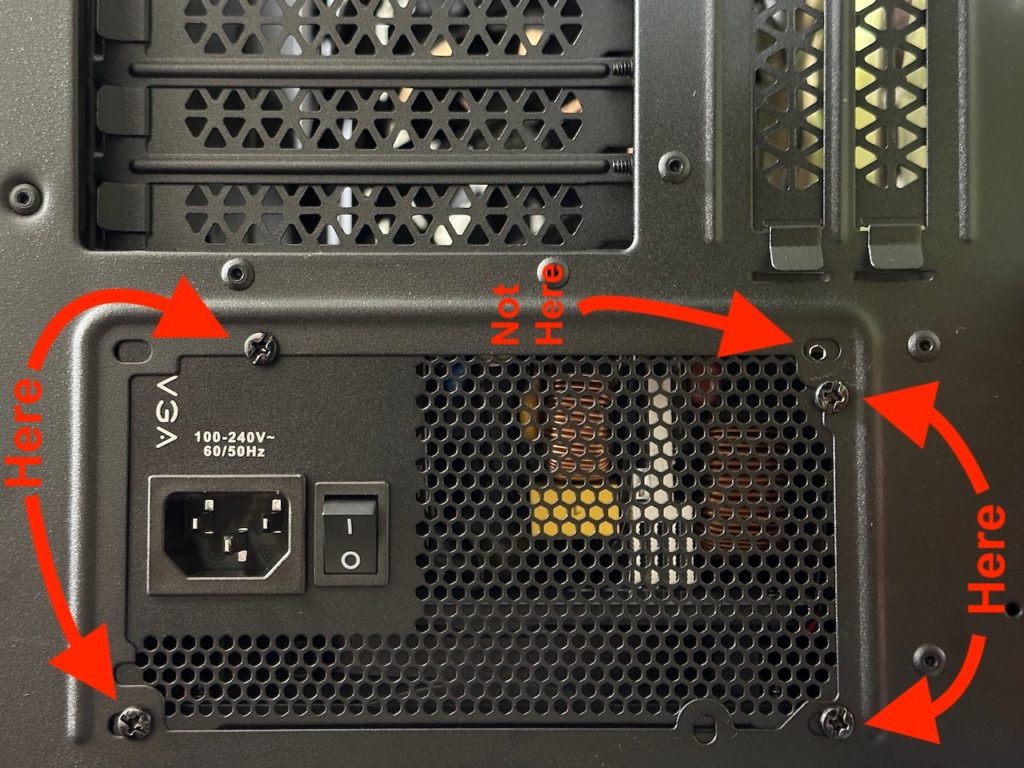
DIRECTION UP/DOWN — The power supply will seem to be getting installed upside down because the written notes on the power supply will be upside down in the case. This is necessary because the air intake fan needs to face the bottom of the case where the air intake grill is located. Viewed from the back of the PC case, the outward visible writing on the power supply will be in the correct orientation. Only the writing inside the case will appear upside down.
CABLE LUXURY — If you want luxurious spaciousness for the power supply cables, consider removing the 3.5-inch drive bay assembly. It’s placement was a slight design miscalculation in that it is really too close to the power supply. It could have been one or two inches closer to the front of the computer. Perhaps in a future Corsair case design that can be remedied. Given that systems are increasingly moving to solid state drives, the 3.5-inch bays are going to be less useful in the future. A single 3.5-inch drive could be secured in some other way further away from the power supply. This cold be done using one of the plastic drive retaining rail enclosures with a zip tie holding it in place.
SCREWS — The power supply comes with four mounting screws. These are similar in size and threading as the medium size screws that come with the case. When the power supply is positioned properly, there will be two holes where screws can be used to secure the power supply to the case. There are also two U-shaped cutouts that are aligned with the other two screw holes on the power supply. This seems to be the optimal use of the screws. There is an additional hole that is aligned to a smaller screw hole on the power supply. It isn’t necessary. Below is an image with notations. Notice the screws placed in the U-shaped cutouts will overlap the metal edge. Some holes will not be used. A variety of placements are available to accommodate different power supplies.
STEP #3 — Drives
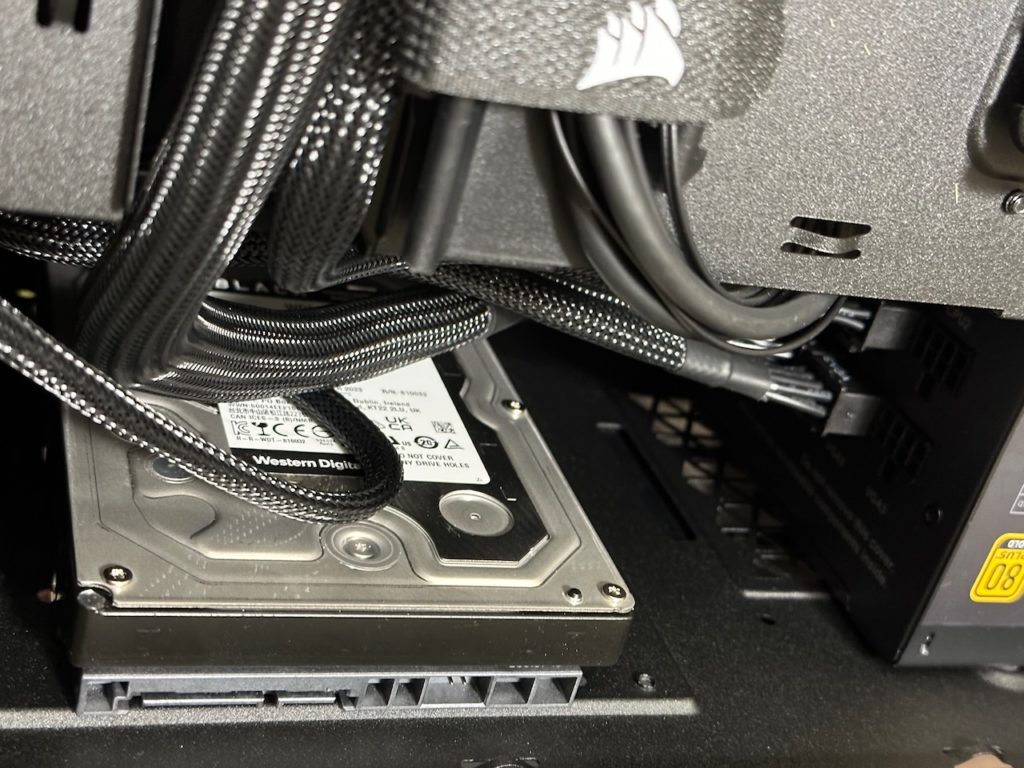
The 3.5-inch data drive can be installed using the provided screw holes in the bottom of the case that are perfectly aligned for drive installation. There are screw holes marked as HDD (for 3.5-inch) and also SDD (2.5-inch) depending on the drive size. The photo below shows the 3.5-inch drive screws installed.
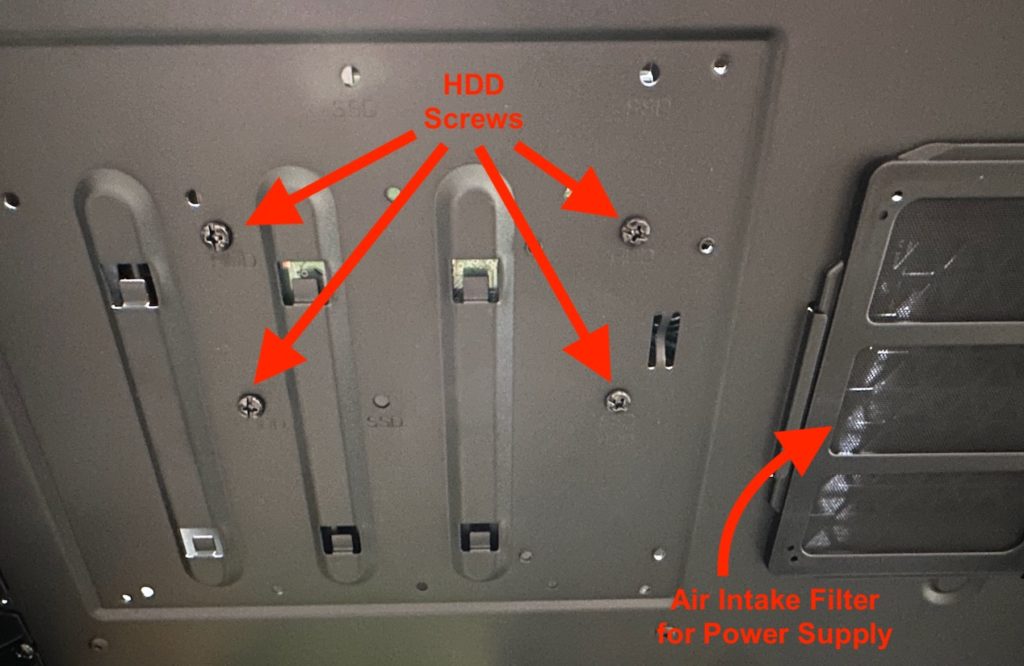
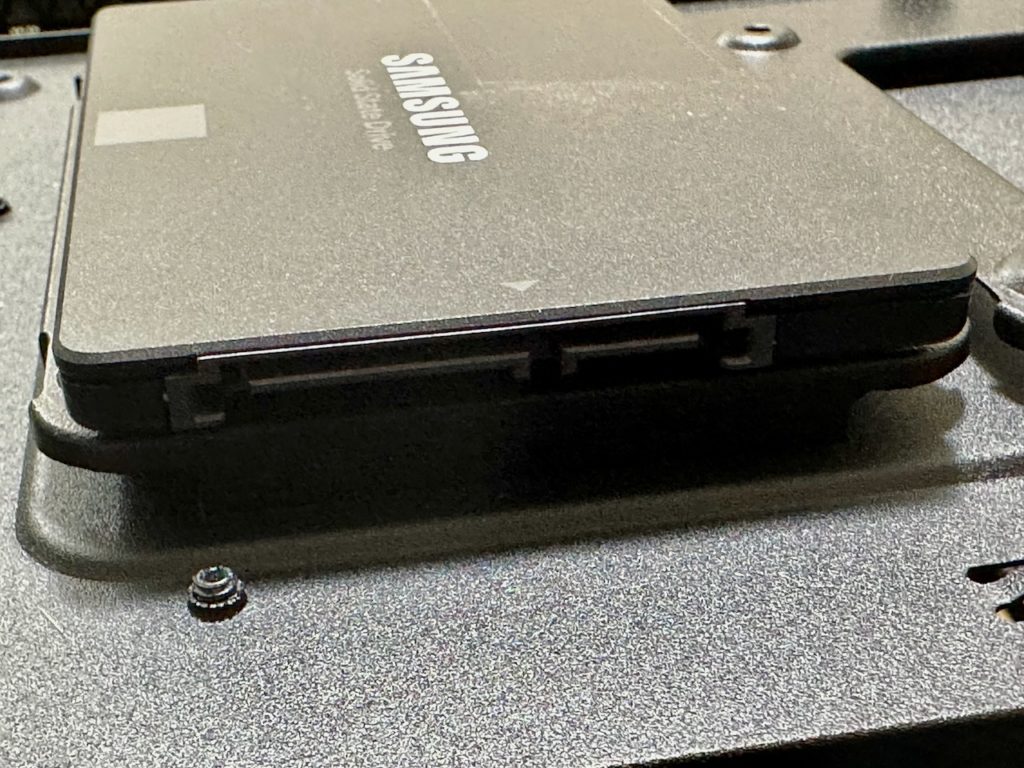
On the the other side of the case, behind the motherboard, there are two mounting plate brackets for two 2.5-inch drives.
DRIVE CABLES — Regardless of what drives are installed in the case, the default SATA power cables and SATA data cables have downward right angles that will not work since the drive mounting is flush against the case surface. It will be necessary to use an extension SATA power cable as an adapter to allow the power cables to plug in straight. [Straight SATA Power Extension ] Note that one end of the cable should be designed to connect with the power source cable. The other end will connect with the drive. [Example] Similarly, flexible braided SATA data cables with straight connectors will be needed for connecting with the surface-mounted 2.5-inch SSD. [View Examples] For the data cables, be sure to use something long enough to go from the drive to the motherboard, such as an 18-inch cable.
The photo below shows how the power and data connections for the HDD have tight clearance since the drive is mounted on the bottom and near the side panel of the case. A braided straight SATA data cable can bend sufficiently for adequate clearance and a flexible SATA power cable extension is adequate as well.
The photo below shows how the surface-mounted SSD requires a straight connector for data and power.
STEP #4 — Motherboard
The computer case comes with a variety of screws including some medium size screws that can be used to secure the motherboard. The screws that come with the case are shown below.
Place the motherboard inside the case to align with the mounting screw holes. You will notice a center post protrudes through a hole in the middle of the motherboard. Most of the screw holes are easy to see and access.
Start with the corner screws, then find the edge screws. The edge screw holes can be found about half-way along the long side of the motherboard. For the short sides of the motherboard, they are not in the middle, but instead slightly forward from center toward the front of the computer. There will be a total of 8 screws used to secure the motherboard.
DRIVE CABLES — The motherboard comes with one angled and one straight SATA cable. For this installation, two straight cables were needed. This is explained in the section describing drive installation above.
STEP #5 — CPU
There is a plastic cover for the CPU socket used only for shipping. Remove it. The CPU retainer bracket has a very strong spring-loaded locking system. The small hooked handle on the long side (the right side) can be carefully depressed and pushed slightly to the right to release it from the retainer. This hooked release handle will hinge upward. Then the metal rectangular retainer frame can be lifted up, as it hinges toward you and downward.
The CPU is fragile so handle it carefully by the edges only. It will gently set into the CPU socket when the retainer frame is out of the way. You’ll notice on the pin side of the CPU, three corners have notches. One does not. The corner without notches matches the top left of the socket. The orientation of the CPU will be vertical with the text readable. Let the CPU rest and drop into the socket. Close the retaining frame and then carefully but firmly close the spring-loaded arm and lock it back in place.
STEP #6 — CPU Fan
The CPU fan includes the appropriate amount of thermal paste to ensure an effective transfer of heat from the CPU to the fan assembly. When the fan is set onto the motherboard, the plastic retainer lets will align with the four holes near the CPU socket. Pressing gently but firmly on the black insertion pieces will guide the retainers into place and hold the fan firmly to the CPU.
STEP #7 — RAM
The two 16GB memory sticks will be installed in the dark pair of memory slots. The middle notch of each memory stick needs to align with the notch of the memory slot. The Vengeance logo and name will be facing the front of the computer.
In the past it was common to have hinged retainer clips for memory slots on each side. This motherboard has a hinged release clip on the top, but the lower retainer is fixed in place. So, do not try to apply pressure to the bottom retainer.
The memory sticks will snap into place when firmly pressed.
STEP #8 — Video Card
If you are using an M.2 SSD on the motherboard, install that before working with the video card. Or, if you are using a 2.5-inch SSD, be sure to connect the SATA data cable from the motherboard to the drive before installing the video card. It’s possible to install the cable with the video card installed, but it’s not as easy.
Remove the expansion slot covers in positions 2 and 3 as ordered from the top of the case. The video card will require those two slots on the back of the computer.
The PCI edge of the video card will have a soft plastic protective cover. Remove that. Then gently but firmly guide the video card PCI edge into the PCI slot of the motherboard. You may see a locking mechanism slide as the card is inserted.
Use the thumbscrews to secure the video card. The power cords and power cord dongle adapter should already be assembled and ready to plug in on the top edge of the video card to the power socket.
Future Upgrade Options
Despite being a fairly high performance configuration, some additional upgrades could be considered for future enhancements.
- FANS — The basic case configuration comes with a single front fan by default, as seen on the Corsair website. [View] There is a $500 case bundle that includes colorful fans and other accessories. [View] Fans can be purchased separately. [View Options]
- LIQUID COOLING — Corsair has a liquid cooling configuration that can be purchased separately. [View Options] There is a $400 case bundle that includes liquid cooling and other accessories. [View]
- M.2 DRIVE — The M.2 SSD technology provides an economical fast storage to be easily mounted directly on the motherboard.
- RAM — The system is capable of accommodating more memory. The current configuration uses two memory slots with 16GB in each slot for a total of 32GB.
- VERTICAL GPU — The case has additional width and expansion slot openings for a video card to be mounted in a vertical orientation. A kit is needed to use this feature. An advantage of this configuration is to free up space on the motherboard. [View Kit]
Documentation
Some user guide and setup documentation is included with the components, but additional materials are available on product web pages and in digital format as downloadable PDF files. Here is a list of the resources most likely to be useful. The manufacturer product pages are linked below. Additional information can be found on the vendor sites linked elsewhere in this document.
- CASE — Product Web Page – User Guide PDF
- POWER SUPPLY — Product Web Page – Note that the product page has a link to manuals, but there does not seem to be a downloadable manual for this particular power supply.
- MOTHERBOARD — Product Web Page – User Guide PDF
- VIDEO CARD — Product Web Page – Product Support Page
